Pages

Tuesday, January 31, 2012

CSI -Case File No. 4 Challenge - WONDER

I found this cool new challenge blog -- you should check them out!

It is SO MUCH FUN to play along!  Here is the link:   CSI = Color Story Inspiration


Head on over there to check out the complete challenge and start playing along!


Here is how it works - they give you a theme, along with other items to include in your layout - and then you work your scrappy magic!  Here is my entry for CSI's Case File No. 4


This is a picture I took of our new Puppy.  I just love how she was looking off into the distance and I really WONDERED what she was thinking about - coming into our home, and being part of our family.


Here is a close up of the Dusty Attic Swirl that I painted with Adirondack Gold Paint - then sprayed it with Black Gold, Aquamarine and Verdigris Glimmer Mists - then hit it "here and there" with Golden Goddess Glimmer Glam.   I used the Gold Paint to edge the Black Bazzill Cardstock, and used Glimmer Glaze in Aloha to edge the photo, and Oil Slick to edge the light teal cardstock.

Here are some of the "goodies"  I used two different patterned papers to create stripes, the beige letters are from Bo Bunny's Et Cetera Chipboard collection. There are LOTS of Prima and Petaloo Flowers. Along with Kaisercraft Blossom Resin Flowers and Sparklets.  Bo Bunny's Candy Jewels added some more bling too!


A Tim Holtz Tag created the perfect journaling spot.

This is the CSI File -

I think I was able to SET THE SCENE "Through the Looking Glass" by including 
all of the colors in THE SCHEME
For the EVIDENCE: I included a Frame, and I used Wet Mediums and Stripes, along with Rhinestones
For the TESTIMONY - I "got Curious" in the journaling and "Stepped" the Title "Wonder" which is what I was trying to show as the "feel" of the Layout.

Well, I certainly had fun playing along!  Head on over to the CSI website - feel free to leave a comment under my photo if you'd like - and be sure to play along!

PS - ALL of the products used to create this layout came from my Local Scrapbook Store
Scrap-a-Doodle Doo

Thanks for looking!

((HUGS)) ~ Sherri


Monday, January 30, 2012

Magical Challenge ~ Creative Scrappers# 192


SEE  - I told you Scrapbook Challenges were addicting!!  ( well at least for me!)

OKAY - here is the Sketch I used for inspiration  ( 'cause we all need a little from time to time! LOL!)


So - I took this in a little different direction....
I hope you like it as much as I do!  I am so happy with how it came out!

Instead of Stars - I went with Hearts <3 !  I used more of the paper and embellies from My Mind's Eye, Stella and Rose collection, some Bazzill, and these ADORABLE fabric THICKERS from Amy Tangerine!!  In keeping with the stitching detail on the letters - I decided I needed to do a little hand stitching on this layout too!  Of course I had to add some BEADS from ArtC's Natural Bead collection!

I just LOVE all the colors in this collection!  You can get a good look at the distressing on all the edges - I again used Ranger Distress Stain in Rusty Hinge - you can really see it here on the photo - COOL huh!?  Oh - and this is a good close up of the hand stitching too.  See the little flap I folded over and did a Zig-Zag stitch on?! FUN!!  The tag you see is sprayed with Tattered Angel's GLIMMER MIST in Golden Terracotta and Sunflower - I used a PRIMA Swirl mask to get that cool look!

Here is another close up of the stitching and beading, and the cool canvas letters! Oh - I used Ranger Distress Stain in Barn Door Red to give the color and dimension to the red hearts too!

Here is an angle shot -to show you the dimension.  I added the center photo with HELMAR ZapDots - LOVE THEM!!!

So   - THANKS for stopping by - I hope you liked my take on this sketch challenge, and that I've inspired you to CREATE SOMETHING!!  ( get out your needle and thread and "have at it!" LOL!!)

(( HUGS)) ~ Sherri


Creative Scrappers Sketch # 190 ~ Princess!

Here is a layout I made following Creative Scrappers Sketch # 190

Have you ever tried following a sketch?  They are really fun!  I LOVE to try to follow along - and add my own spin on the suggested concept.  

If you've never tried it - go for it - Creative Scrappers is a fun site to go play on!

WARNING !   Sketches can be addicting - and in my opinion - that is NOT a bad thing!

Okay  - so first - here is the sketch:


and now here is my take on this design -

This is a layout featuring one of my favorite photos of my 50th Birthday trip to one of my favorite places Walt Disney World.  I am so blessed to have such a WONDERFUL Husband ( of almost 30 years!) and YES, he does make me feel like a Princess!


I used papers and lots of embellishments from My Mind's Eye - Stella and Rose Collection.  The base is Marble "Joy" Crocheted Paper and the others are from Gertie "Friends Forever."
I love how the colors pick up all the colors in the photo!!!

Here are a few close ups of all the details:

I just LOVE to play with The Dusty Attic Chipboard elements!  This one is their Baroque Frame
Oh - what didn't I do to it!  First a coat of Claudine Hellmuth paint in Altered Orange, then some Ranger Distress Stain in Rusty Hinge, then some Ranger Distress Embossing Powder in Broken China, then a little Adirondack Gold Paint dauber - I just LOVE how you can build the dimension and texture on DA's Chipboard! 

I added the word KISS from Tim Holtz's Word Sticks that I colored with Ranger Alcohol Inks.  The word PRINCESS is a "DOO DAD" from my FAVORITE Local Scrapbook Store Scrap-a-Doodle Doo!  I covered it with Ranger Distress Stickles in Vintage Photo. There are also some Prima Sculpture Resin Flowers scattered here and there!
I used Cosmo Cricket's Tiny Type letters - fun stuff! Another NEW "LOVE TO DO" of mine is to INK all my edges with RANGER Distress Stain - I don't know what I did before this cool stuff came out  ( THANKS TIM HOLTZ!!)  It makes edge distressing soooo easy!! I used RUSTY HINGE everywhere!  LOOK - I ever ran it along the edge of my photo!!!  I LOVE THIS STUFF!! 


I took a photo at this angle so you could see all the lovely dimension!
Well, THANKS for looking - I hope it inspires you to GO CREATE something!!!

Let me know what you think - a little BLOG LOVE goes a long way!

((HUGS)) ~ Sherri


Wednesday, January 25, 2012

Packing for the Candyland Crop weekend!

Well - there are only 2 more SLEEPS to count, until it is time to spend the weekend with all my Scrappy Friends at Scrap-a-Doodle Doo's CANDYLAND Theme Weekend Crop!  There are OVER 90 of us attending this event, and I am even teaching a class too!  I can't wait!!

Every crop - I promise myself that I am NOT going to bring so much scrap stuff - BUT try as hard as I might - things never work out that way - and I end up ALWAYS being a member of the "OPC!"

What the heck is the "OPC" you ask? - well - My friend Pattie introduced me to this special organization, which many of you probably belong to, and don't even realize it - you see those letters stand for "Over Packers Club" and YES I AM PROUD TO ADMIT - I AM AND it seems like I ALWAYS will be a HAPPY CARD CARRYING MEMBER! LOL!!

I have about 10 projects packed - plus a good part of my embellishments, tools, all my Glimmer Mists (hey - can't leave home without them!) my Cricut too - (I SWEAR I am going to use it this time!!!)  Plus who knows what else - as I never know what I'll feel like doing/creating - so there was lots of "just in case" packing going on!

The Challenging part for this crop -was where to "stage" or hold all the crafty goodies until I am ready to load them in the car.  This never was an issue before when our precious Lily was around - she was truly a Princess and NEVER touched anything that wasn't hers or that she wasn't supposed to..... BUT - Little Miss Maggie - the little 14 week old fur ball that we have now is a WHOLE  "nother story!!  LOL!

So - where to put all that Scrap Crap until it is time to pack the car for the weekend - so that it didn't have little teeth marks on it? 

I came up with a solution......Please - just don't let anyone turn on the water!! 

Yes, that is our big Raspberry Jacuzzi Tub - circa 1991  - Hey atleast it is getting some use and Maggie is too little to jump over the side!  Oh - and that is about half of the "stuff" I'm bringing - so if you are going to the crop - and if you forgot something - please see me - I'll probably have it with me! LOL!

Hmm.... maybe I should start to think about - and pack some clothes next!

Please leave a comment and let me know you PROUD to belong to the OPC too!

CLUB MEMBERS UNITE!!

~Sherri


Thursday, January 19, 2012

Hey Mom, What's for dinner?

Here is what I made for dinner last night - it was really good!

"Semi- Homemade" Kung Pao Tofu Stirfry


Here is how you can make it too -  ( and if you can't do Tofu  - use boneless chicken!)

This made @ 4 servings.

Ingredients:

Olive Oil and Sesame Oil to stirfry in

1 pack of extra firm Tofu - pressed and well drained - cut into @ 1" cubes


1 Large Onion - cut into 1" pcs

@ 3 -4 Cups FRESH cut up veggies ( I bought a pack from the produce dept at my local supermarket - it contained bokchoy, red and green peppers, onions, celery, carrots) *feel free to us whatever you have on hand or like.


@ 3/4 C Chunky Peanutbutter

2 Tablespoons Rice Wine Vinegar

1 Teaspoon Red Pepper Flakes

3 T plus 1/4 C Soy Sauce

1 pack of Annie Chin's Kung Pao Noodle Bowl  ( that's the "Semi" part!)


I browned the tofu cubes in some olive oil, sesame oil and added @ 3 T of soy sauce - along with some sesame seeds that I had on hand. I removed them from the pan added a little more of the oils, and then stir fried the onions and the rest of the pre-cut fresh veggies. 

While they are cooking - prepare the Noodle Bowl as directed - EXCEPT - cut the noodles in 3rds before heating - and DO NOT DRAIN the 1 Cup of water after cooking.  Instead - ADD the Sauce pack and the Peanut butter to the bowl and stir until blended

When the veggies are tender crips - don't over cook - add the Vinegar, 1/4 C Soy Sauce and the pepper flakes, then add the mixture in the noodle bowl.  Stir and let simmer until flavors blend, and sauce thickens a little.  Put into your serving bowl and sprinkle with peanuts that come in the package with the noodles.

A great addtion would be some water chestnuts, and scallions - (but I didn't have these on hand.)


I hope you give it a try!  It's a quick and easy work night meal!
 
Thanks for stopping by!~Sherri

PS - how do you like my new BLOG design?!!

Sunday, January 15, 2012

Snow Loved! REVERSE Canvas project

Hello Everyone!  Below is my second post on Helmar's Design Team Blog, as their January Guest Designer.
I hope you like this project.  If you are in the Northern NJ area - I am offering this REVERSE CANVAS Class on Feb 4th at Scrap-a-Doodle Doo in Ramsey, NJ - contact info is below. There are only 4 seats left - so please contact them ASAP to reserve a seat!  Thanks for looking!

This is Sherri Caramico, back again with my second post as January's Guest Designer for Helmar and I want to share a very special project with you. 

I decided to create another reverse canvas project - believe me, once you try one - you will get hooked on this fun, dimensional decorative piece of art!

First, please allow me to give you a little background on the photo that I used in this project.

We were blessed to have an AMAZING and LOVING Portuguese Water Dog, named Lily
( aka Turnabout's Princess Water Lily) share our lives for the last 11 1/2 years.  She was diagnosed with TCC / Bladder Cancer in July 2011, and spent the last 4 months of her life putting up a tough battle, endured chemo, and was spoiled as much as she could be, by all members of our family.  On November 12th, at 3:00am, my husband and I had to take her to the vet and do what was best for our girl, and the hardest thing we have every had to do.  I am thankful we were able have the strength to finally give her peace, and we know that she is waiting for us over the Rainbow Bridge.

I found a photo Lily from the winter of 2009, and it made me smile - I just knew I had to do something special with it.  PWD's have hair, not fur, and pretty much become a giant mitten with clumps of snow sticking to them when they go out to play.  Lily also liked to sniff snow, and playtime in the snow usually ended with me sitting on the floor, melting clumps of snow with a hairdryer! LOL!

I used lots of great products on this project - here are just a few ( I'll list them all at the bottom of the post for you!)


I started with a 12" x 12" Canvas, and gave the edges, sides and some of the center a good coat of Gesso, I also added some randomly to the chipboard snowflake.


Before spraying with various shades of Blue Glimmer Mist, I applied some True Snow to corners of the frame to give them some texture.

After the Glimmer Mist, I used Viva Decor's Silver Metallic Modeling Creme for the first time!  OH MY!! This was LOTS OF FUN!! - I used a plastic glove and applied it with my finger tip - kind of like finger paint!!

Look at all those layers!  I achieved them with various thicknesses of Helmar ZAP DOTS - my new FAVORITE 3D Double Sided Adhesive Foam!  Notice the shimmery Silver Modeling Cream both on the "frame" and I even used it to "distress" the the edges of the photo and paper too!


Here is the finished project - I just LOVE the layers and the way the whole project turned out.  Our Lily was "SNOW LOVED" and I think this is the perfect way to honor this picture of her, and a great memory of the the LAUGHTER and JOY she brought to us.


Here is a close up to show you all the beautiful elements, colors patterns and textures and a close up of our much loved loyal friend.

The Helmar ZAP DOTS really helped me to achive that layered look, which worked great within the "shadow box" feel of the reverse frame. ALSO Helmar's Gemstone Glue worked PERFECTLY to adhere the white beaded trim, and the AMAZING Helmar 450 Quick Dry Adhesive was used to attach all other elements - OH -and the large Snow Flake in the top left, and the blue star at the bottom right were given added dimension with Helmar's LIQUID SCRAP DOTS !


Here are the Items/Tools used:
Helmar 450 Quick Dry Adhesive
Helmar Liquid Scrap Dots
Helmar 1/2" and 1/4" foam ZAP DOTS
Helmar Gemstone Glue
12x12" Canvas by Canvas Concepts
Gesso
Little Yellow Bicycle's Winter Twig Collection
Tattered Angel's Glimmer Mists ~ Teal Higheel, Patina, Autumn Nights, Bubbles
Aleene's True Snow
Viva Decor Silver Metallic Modeling Creme,
White cardstock letters cut out with Tim Holtz "Vintage Market" Alphabet Die
colored with Tumbled Glass and Chipped Sapphire Ranger Distress Inks
Donna Salazar Fairydust Glitter
Fiskars Boarder Punch
Chipboard Snowflake
Kaiser Sparklets
Bazzill Clear Button
Pearl and Silver Snowflake ribbon
Clear Acrylic Embellishments 
99% of these items were purchased at my favorite Local Scrapbook Store
Scrap-a-Doodle Doo  - they also have an on line store too - just click on their name!

I hope I've inspired you to give a REVERSE Canvas a try!
Please follow my BLOG www.shercara.blogspot.com for new projects and adventures!


If you are in the Northern NJ area - I am teaching a class to make this project on
Saturday, Feb 4th at 12:00 Noon at Scrap-a-Doodle Doo - seating is limited to contact the store ASAP to reserve a seat 201 818 7060

THANKS HELMAR!

~ Sherri Caramico


REVERSE CANVAS Class Feb 4th at THE DOO!

Please join me for my upcoming class at:


Scrap-a-Doodle Doo
37-C Swan St
Ramsey, NJ
201-818-7060 - CALL TO RESERVE your seat ASAP!
http://www.scrap-a-doodledoo.com/

Saturday, February 4th at 12:00 noon


Cost $40.00 per person

LIMITED to 10 Students - Sorry, NO KITS will be available, as much of the products are consumable supplies shared by the teacher.


12"x12" REVERSE CANVAS CLASS
~featuring Little Yellow Bicycle's WINTER TWIG Collection!


Come and learn some fun new techniques, and leave with a BEAUTIFUL project that will be ready to hang or display.

By using the back or reverse side of a 12 x 12 Canvas, you will create a 3-D Frame, or shadow box effect. This enables you to capture your favorite winter memories in a very UNIQUE way.

We will be using Glimmer Mist, (Chalkboard and Original) and Viva Decor Modeling Creme. We'll make our own flat but shiny faux "Thickers" using our Xyron and Fairy Dust! (this is soo cool!) You'll learn 2 different ways to use True Snow and lots MORE FUN STUFF!


Each Student must bring to class - Your basic tool kit - INCLUDING or PLUS ~ a HEAT GUN, Splat Mat, 12x12 Trimmer, Scissors, Tape Runner, Liquid Adhesive ( like Helmar 450, Fabritac, or Zip Dry ) FOAM POP DOTS, TWEEZERS and either bring or have an idea as to what size photo or photos they want to use - ( my sample has a black and white 4x6 vertical photo -but a color photo would look good too - I would suggest only (1) 4x6 photo -either vertical or horizontal - or possibly 2 smaller photos)


OPTIONAL items: ( which will be provided by the teacher - but you may want to use your own) any BLUE GLIMMER MIST ( I used Chalkboard Teal High-heel, along with Patina, Autumn Nights and Bubbles. Any BLUE Distress INK ( I used Chipped Sapphire, Tumbled Glass, Broken China) and an applicator - Small Xyron "X" and adhesive - all for your personal use, instead of sharing - if you prefer.


ALL SUPPLIES mentioned are available at Scrap-a-Doodle Doo - please call the store ASAP if you need to purchase any for the class.


Here is a "SNEAK PEEK!"


More info and full photos to follow later this month on my BLOG and on my upcoming JANUARY GUEST DESIGNER post over on the HELMAR DESIGN TEAM BLOG too!


REMEMBER - CALL 201-818-7060 - TO RESERVE your seat ASAP!


THANKS! SHERRI


Saturday, January 14, 2012

Lots 'O Layer's Class at Candyland Crop 1/28/12

Here is a SNEAK PEEK of the 1 page Layout I will be teaching at Scrap-a-Doodle Doo's CANDYLAND Weekend Crop - January 27th - 29th!   ( We are already "counting the sleeps" until this FUN CREATIVE Weekend with lots of good friends arrives!  Check out and LIKE their Facebook PAGE!)

The paper featured is from Webster's Pages Ladies and Gents Collection.

I will be teaching Water Distressing, along with a 3D Picture Frame Technique.  We will use Tim Holtz Distress Stains, My Mind's Eye Pearls, and YES those are Peacock Feathers!

Cost: $15.00 per person - LIMIT to 12 Seats  ( Actual time / date during the weekend TBA - and Sign up sheet will be at the Crop)

Suggested Photo size is @ 4" x 4"

Bring to Class:   12 x 12" Paper Trimmer, PENCIL, small sharp scissors, THICK 1/2" Helmar Zap Dots (suggested) or any foam dots, Liquid Adhesive ( Helmar 450 Quick Dry suggested) Tape Runner.

The following items are "BRING IT OR BUY IT"  - I will have (1) of each of these consumable supplies to share with the group.  IF you would like your own to work with at your own pace in the class, (and to add to your "scrap stash")  PLEASE be sure to ORDER YOURS from THE DOO - ASAP - at 201 818 7060, and they will have the item at the time of your class.

Tim Holtz DISTRESS STAIN - in Shabby Shutters and Peeled Paint

Okay - Okay - I made you wait long enough - here you go!  ( I hope you can join me!)


Let me know what you think!

THANKS ~ Sherri

FOLLOW "THE DOO" on their BLOG - to keep up to date with the CLASSES and EVENTS they offer!

Tuesday, January 10, 2012

Scrap-a-Doodle Doo's Jan MEGA KOTM will release on the 14th!

Hello everyone!

I just HAVE to share a few Sneak Peeks with you!

I just got finished designing the January MEGA Kit of the Month for my FAVORITE Local Scrapbook Store SCRAP-A-DOODLE DOO in Ramsey, NJ, and I LOVE how it turned out!!

These Kits are FULL of coordinating products, AND come with COMPLETE instructions and color photos so you can make (2) TWO page Layouts - PLUS have LEFT-OVERS!!

The SAMPLE is in the store now - and the KIT will be RELEASED for SALE on JANUARY 14th!

PLEASE NOTE  - these kits are LIMITED in number - so if you want one - call the store to order yours ASAP  201-818-7060!  ( YES THEY SHIP THEM TOO!)

This months MEGA Kit features BoBunny's HOT NEW "Enchanted" Collection and Tim Holtz Distress Stain!

Here is a "SNEAK" of the "INGREDIENTS"


I've also included instructions on how to - Water Distress / Tear your paper, Edge Distress with Distress Stains, and PAINT your layout with Distress Stains too!   ( There is even a little tip on what you can do with Baby Powder too!)

Here are a few more "SNEAKS"

Water Distressing Technique

I have no idea how or why this photo came up sideways - but it is a Sneak Peek after all - so use your imagination - or just tilt your head to the right! LOL!!
I think it is HOT either way!


THANKS FOR TAKING A PEEK!  Don't forget to call THE DOO - to order your KIT  201 818 7060, or get it ON LINE!  <---  just click here to contact them to order~

~ Sherri

Friday, January 6, 2012

Helmar January 2012 Guest Designer "HOME"

Hi everyone!  I am so HAPPY to announce that my first post as HELMAR's January 2012 Guest Designer is UP on their Blog!  Check it out at over there or below!


I'm Sherri Caramico and I am SOO EXCITED to be here - as this is my first post as a GUEST DESIGNER for my most favorite adhesive company HELMAR !!  I am very grateful for the opportunity, and I LOVE  working with Helmar products! 

Before I get to the "sticky, crafty Helmar Goodness" let me first tell you a little about myself.

I am a mother of 2 wonderful sons, who are 22 and 17, and the wife to my amazing husband of 29 years-my high school sweetheart!   Both my husband and my sons support my scrap habit and endure my endless requests to take their picture! I know someday they will thank me when they can look back on all the wonderful memories I have preserved!

I work full-time in the corporate world, but enjoy a creative escape whenever I can fit it in. I've been scrapping since @ 2004, and I guess you would say that my style is full of dimension, texture and color. I am a scrapbooker who has become more and more interested in altered art and mixed media projects. I am not afraid to stretch and reach outside of the standard box - although I will tell you a little secret, I still remember that fear and the funny feeling that came over me the first time I ever cut and tore a 4 x 6 photograph!! ( I know you know what I am talking about!)


I am a member of the Scrap-a-Doodle Doo Design Team in Ramsey, NJ, and one of the lead educators at the store.(one of the few LSS left in our area.)  I was selected to be part of Cheerio's Eat Healthy campaign, and made a video about my "Passion for Scrapbooking" which was filmed at the store back in 2009. You can view the video here: Cheerios ~ Youtube    I LOVE meeting people and teaching them new techniques. I always try to gently push them to reach outside their comfort/creative zone, to try something new-usually the messier the better! I feel a sense of accomplishment when I can help someone who once said "I could never do that" change their thinking to "Wow, I did that!" after trying something new in a class that I was teaching. 


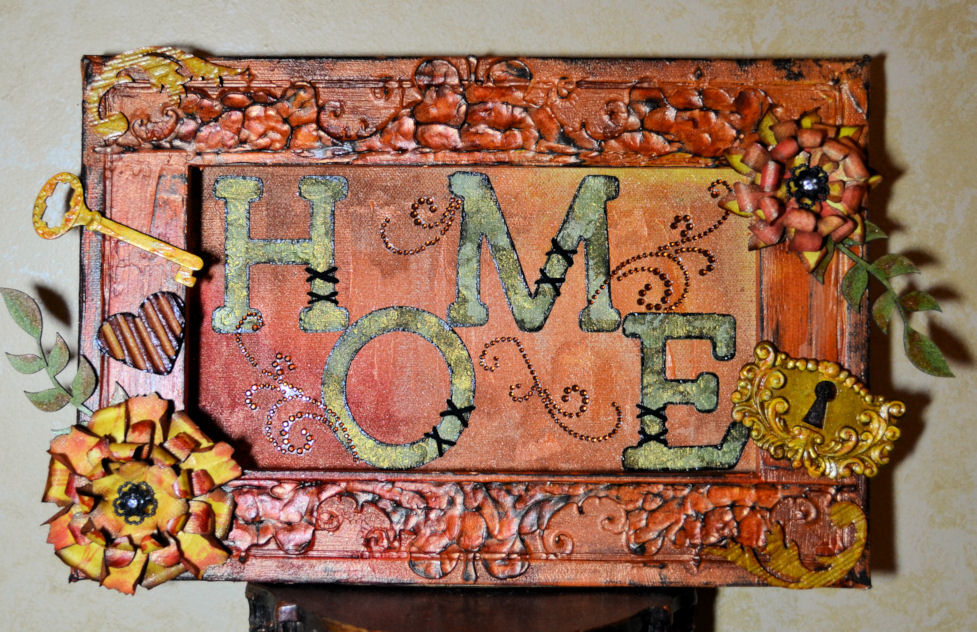
Since I won Helmar's facebook contest to secure this coveted spot back in November with my "HOME" reverse canvas project ( for which received the most votes - and lots of wonderful compliments too! THANKS!)- I've decided to share some info on how it was made -with hopes to inspire you to give it a try!

First off, I started with an  8" x 12" blank canvas  - and turned it over to work on the back.  It becomes a frame/shadow box this way.  I painted a nice thick coat of Gesso on the frame and sides - and just kind of brushed the center canvas portion "here and there."

Next I took the scrap or punched out piece of chipboard from The Dusty Attic "Wrought Iron Trim Set" # DA0547  ( I save everything!)  and literally filled it with an nice thick layer of Gesso that I applied very liberally - okay - kind of in gobs!

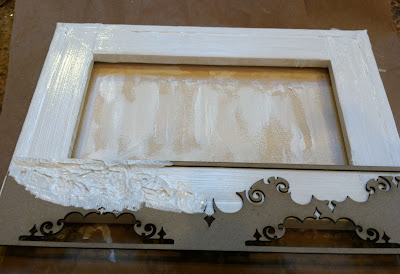
here is the beginning of that step

Here is one completed side - see the texture! It is going to LOVE being sprayed with Glimmer Mist!

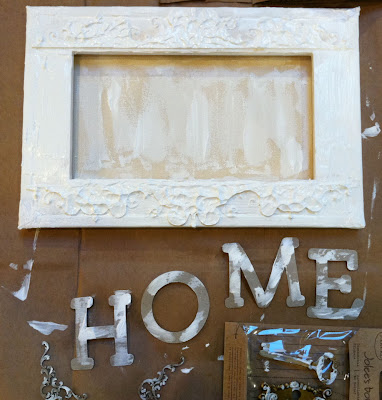
I also brushed some gesso on the Grungeboard letters that I cut out with my cricut, and on the chipboard embellishments, and allowed everything to dry well overnight.  The letters were later sprayed with Olive Vine Glimmer Mist ( one of my ALL TIME FAVORITE COLORS!) 

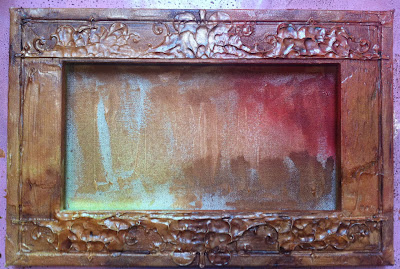
Next it was time to add some Tattered Angels Glimmer Mist  to the frame - I love blending and adding LOTS of color - I always start with the lightest color ( in this case Wheat Beer in the bottom left corner) and added Candy Apple Red and Chocolate Covered Cherries for the brown tone.  I also distressed the whole frame with Ranger's Black Soot Distress Ink pad.
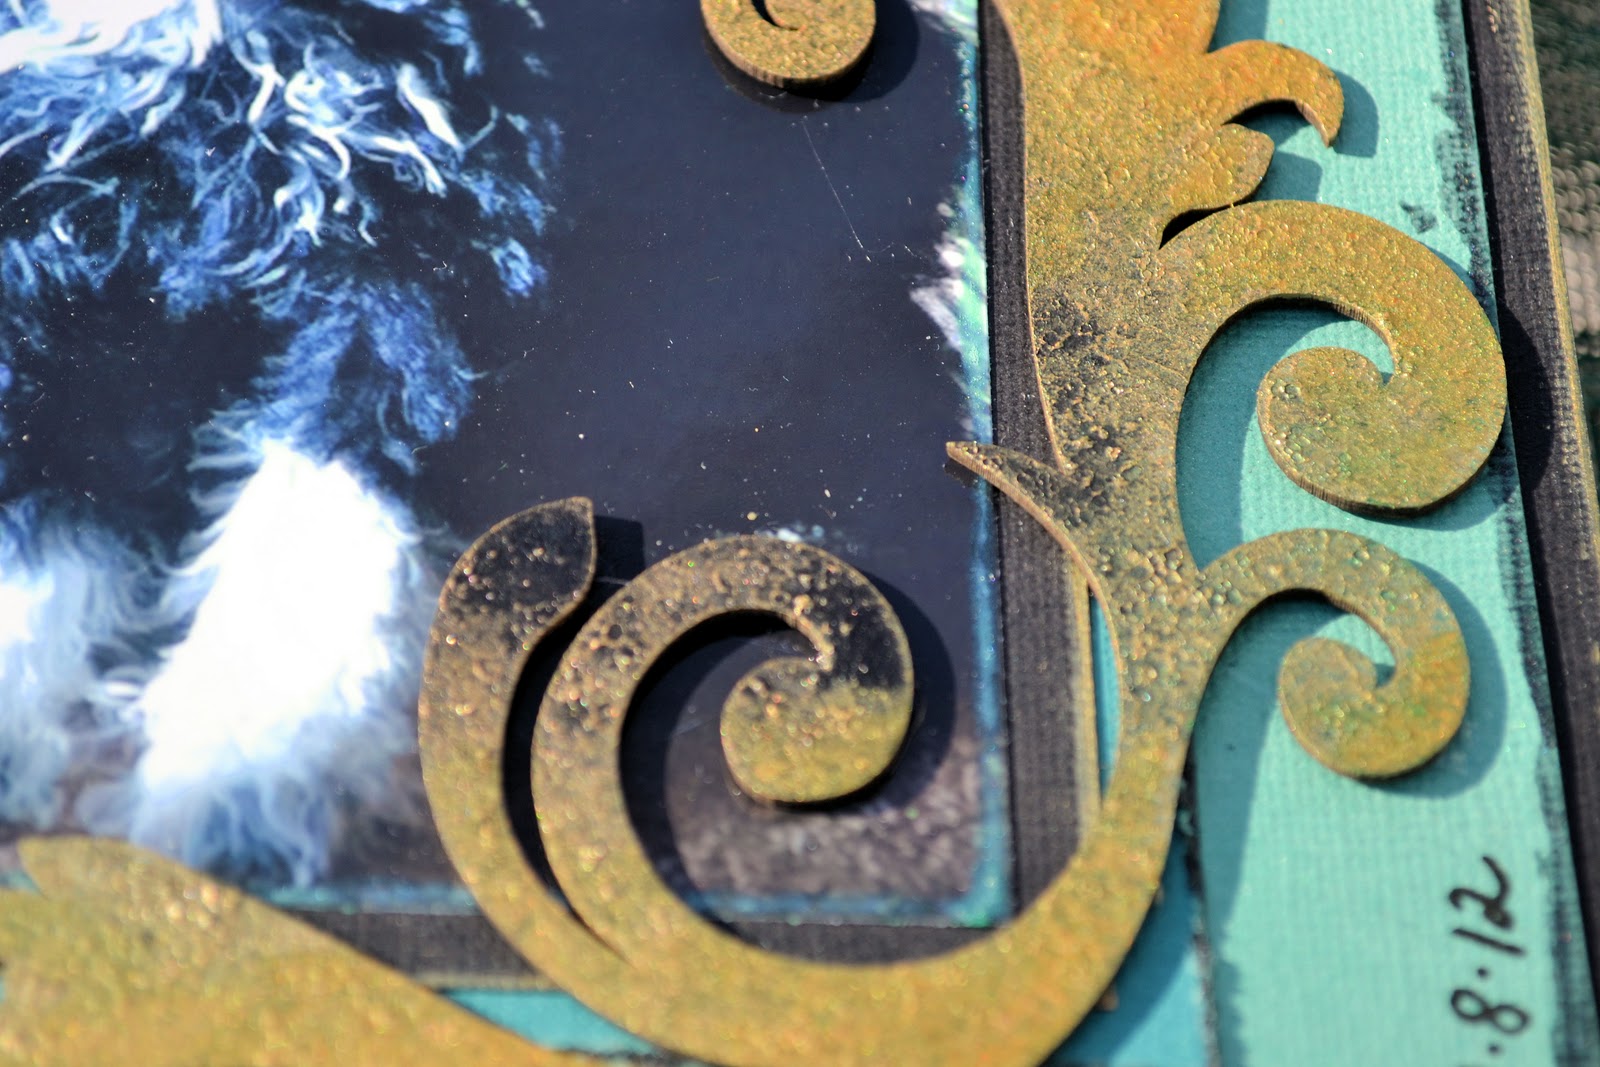
Here is a close up of all that Glimmery Goodness!

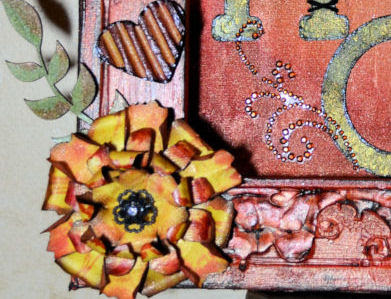
I made paper flowers out of white cardstock that I colored using the same Glimmer Mists that were used on the canvas - I used a paint brush to add the color to the edges of the flowers - If you've never dipped your paintbrush into a bottle of Glimmer Mist - you don't know what fun you are missing!! LOL! The flower was glued together with Helmar's 450 Quick Dry Adhesive, which was also used to adhere the Grungeboard "HOME" to the canvas too!
LOVE THIS STUFF!

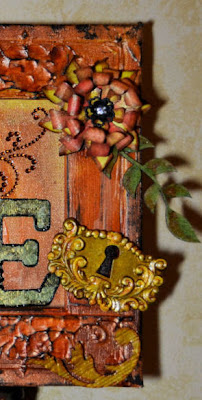
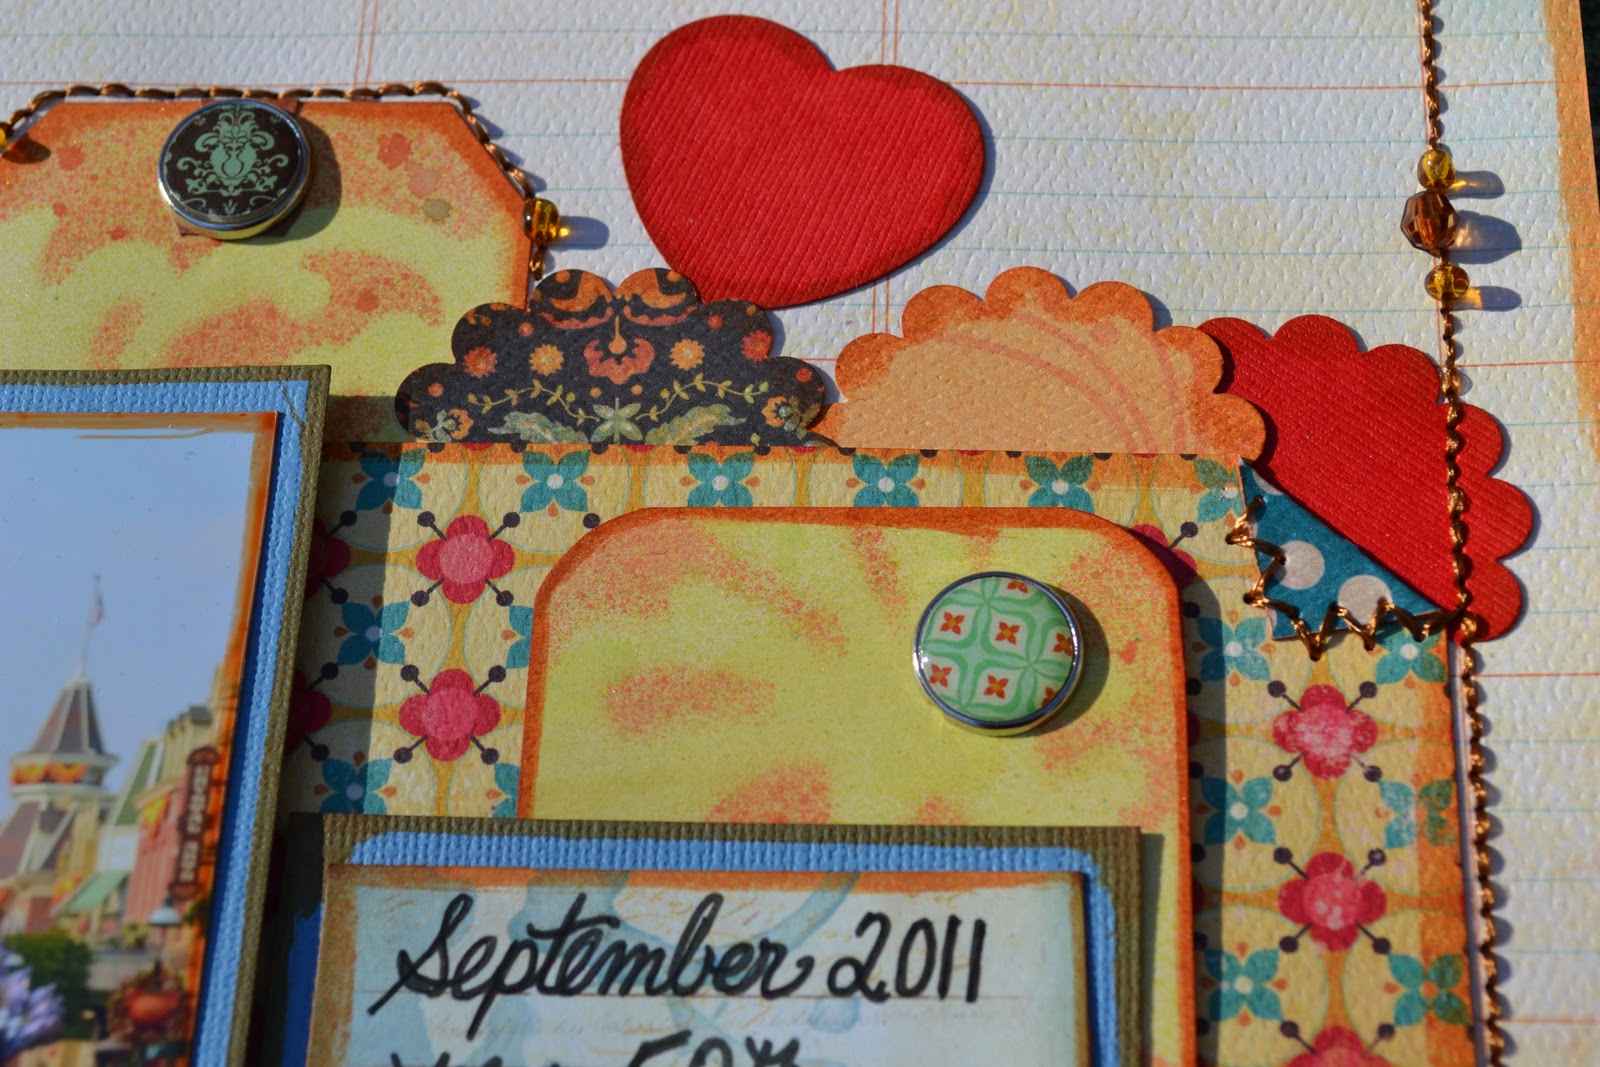
All of the elements on the frame were attached with Helmar's 450 Quick Dry Adhesive, and Helmar's Liquid Scrap Dots worked PERFECTLY for the metal button centers on the flowers - I think this is one of my ALL TIME FAVORITE products!  

A definite MUST HAVE to add dimension with ease!
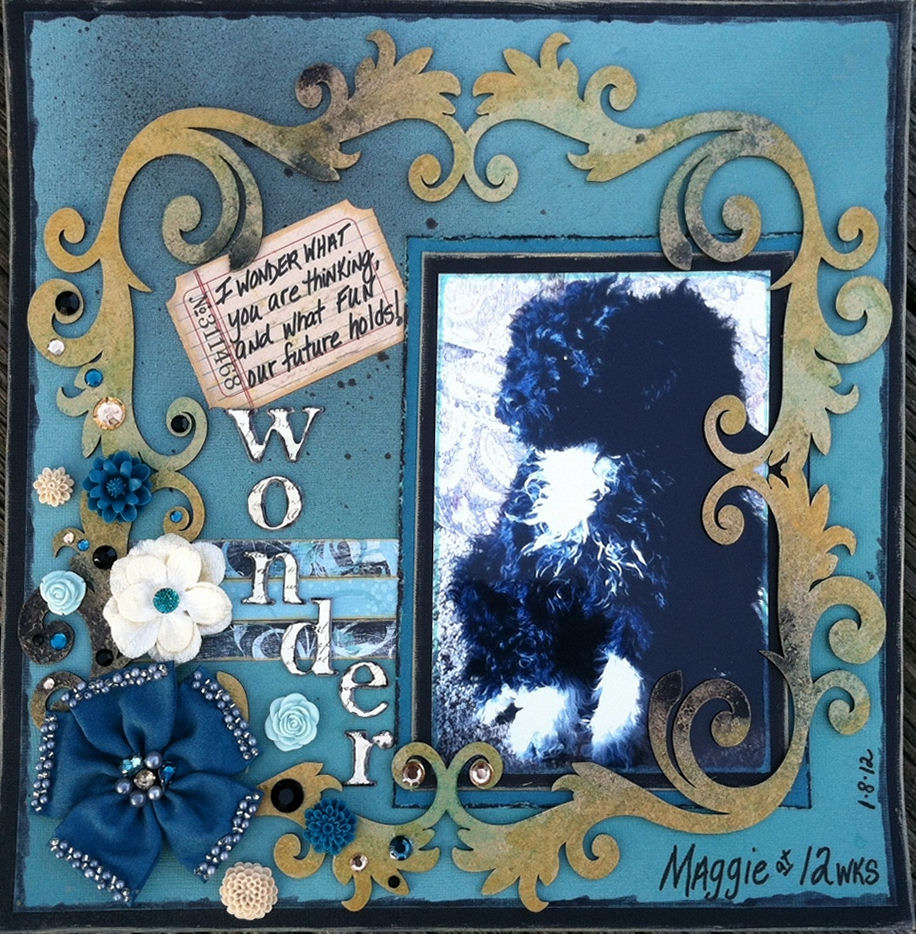
Here is my finished piece.  I really hope you like it and it inspires you to try a reverse canvas too! 
So much fun!
Thanks for looking!  
Now go CREATE SOMETHING!!
Sherri

Monday, January 2, 2012

My last "SCRAP HAUL" of 2011!

Well, I couldn't let the Holidays go by without a little treat for myself - so while I had a few days off last week,  I went to my FAVORITE Local Scrapbook Store - yup, you know it "Scrap-a-Doodle Doo!" to see what I could find!


I brought my new little Princess Maggie with me to meet my friend Stephanie, and she comfortably fell asleep on the floor while Mommy did a little shopping - ( sorry, no photos here - my purse and phone were in the car - oops!)


Anyway - I wanted to share my "END of YEAR HAUL" with you - and please don't be jealous - you too can purchase these items - either at the store ( 37 Swan Street, Ramsey, NJ  201-818-7060)  or - at Scrap-a-Doodle Doo's On Line STORE!  So don't feel left out! LOL!!


When I got home - I snapped a pic of my lovely haul  - here you go!


I LOVE all the "NEW STUFF" they got in from The Dusty Attic! Stephanie and "THE DOO" team always try to have the latest and hottest new products available!! 

Look at those FEATHERS!!! My Glimmer Mist is begging me to use it to spray all over them!!  How about that cool CHICKEN WIRE -- that is going to bring me hours of FUN!! A girl can never have too many swirls - so I pick up two packs of them!  And I couldn't resist the Lacing Tash that was designed by my friend Natasha!

I "scored" me some new Scor-Tape ( LUV IT!) and couldn't pass up the Donna Salazar/Spellbinders Rose Creations Die, and the Tim Holtz Decorative Strip Die too!   I also picked up some Silver Modeling Cream  and Donna Salazar Fairy Dust -to use on my next project - a Reverse Canvas Class at THE DOO on February 4th - so save the date - it has a Winter theme and the Silver Cream and Fairy Dust really looks AWESOME on it ( sneak peaks coming soon!)


I want to also wish all of you a very HAPPY, HEALTHY, and CREATIVE 2012!


ALL THE BEST!
Sherri