Pages

Thursday, February 26, 2015

W*A*S*H*I - Challenge #23 from Scrap Our Stash!

I just LOVE the challenges over at Scrap Our Stash!  
I've got quite a BIG Stash,
and I am so happy they "Challenge" me to use it!!

I decided to use this month's STASH Challenge #23 which is to include elements on my layout that start with each of the letters in the word "WASHI!"  

This was a FUN one and I had a blast making this layout!!  I decided to go "a little crazy" and use quite a few products from my stash - some that haven't been touched in a while!

Here are the items I used for the challenge:
W = White Gesso / Wire and Washi Tape
= Acrylic - Sticker and Embellishments
S  = Snowflake / Stars / Stencil / Stickers
H = Honeycomb (paper)
I   = India Ink

Here is my finished Layout:
The photo is of my "SILLY" Portuguese Water Dogs,  "Valentino" on the left, and "Maggie" on the right.  
They LOVE the snow!!
I guess since they are "Water Dogs," 
any type or water will do - 
after all, SNOW is just frozen water!  
They love to play in it every chance they get!

Here are some close ups and details on how I made this:


I used a white cardstock base that I inked the edges, using chalks and Distress Stains.  I then added the black and white Honeycomb patterned paper after tearing off 1/2" on all four sides.   I took some Tattered Angels Dark Blue Glimmer Glaze and applied it over the torn edge, and onto the white cardstock, using a Q-tip.

I laid out the other patterned papers that I wanted to use. These are from the Winter Twig Collection, by Little Yellow Bicycle - LOVE THEM!! I tore those edges and either inked or chalked them in aqua/blue, silver or black.  I used Mat Medium to adhere them to the base page, once I was happy with their placement.

I wrapped the wire/acrylic snowflake embellishment around the chipboard die-cut snowflake, and also used the mat medium to adhere the chipboard snowflake, and the silver stars to the layout.  I then painted over all of them with white gesso, and also used a star stencil in a few places with the white gesso too.

After the gesso dried, I sprayed the snowflake with Teal High Heel Chalkboard Glimmer Mist, along with spraying it "here and there" on the layout, and through the star stencil as well.   I then used a fine point black Sharpie marker to outline the snowflake and the gesso stars.

Here you can see the fully outlined snowflake and stars. I love how it makes it POP!  I doubled matted the photo, and inked the edges of the mats with Distress Stains and Chalks.  I also painted the Glimmer Glaze around the edges of the photo itself too.  I also added three different patterned Washi tapes too!

Here you can see the bottom right corner of the layout - where there is lots of gesso, Glimmer Mist spray and splatters and some of the black India Ink that I dropped/splattered over the layout.  I added some Red "Bling" to the center of the stars too!  

I picked the Red Bling and Red Washi to "compliment" and draw your focus to Tino's tongue that he is sticking out!


OH MY - there is A LOT going on in this little photo snippet!!
Here is a close up of the Acrylic Elements.  I had these left over from a Christmas decoration garland that I cut up and used on a canvas project/class, a few years ago.  I like how they got splattered with the Chalkboard Glimmer Mist too!  I used the 3 different Washi tapes here too, adding them under the pop dotted and matted snow sticker.  You can also see how I added black and white bakers twine by looping it around the layout and stapling it with my Tim Holtz Tiny Attacher and then added pieces of silver star Washi tape here and there too.  Oh, and don't you just LOVE the Tim Holtz film strip frame die?!  I am so happy that I purchased that die - I've begun to use it more and more and love how it looks cut in half and added on each side of the photo too!

As always, THANK YOU for stopping by!  I hope this layout and and product list below challenge YOU to go ahead and Scrap YOUR Stash - Trust me - it is LOTS of FUN!
((HUGS)) ~ Sherri

LONG LIST OF ITEMS USED:
White Cardstock
Tim Holtz Film Strip Frame Die
Tim Holtz Tiny Attacher
Washi Tapes
Bakers Twine
Winter Twig Paper Collection by LYB
Tattered Angels: Teal High Heel
Tattered Angels Dark Blue Glimmer Glaze
White Gesso
Ranger Distress Stain - Black Soot, Picket Fence, Brushed Pewter
Bombay Black India Ink

Monday, February 9, 2015

The Memory Nest Make it Monday #34 February Sketch Challenge #2

Hello everyone!  It is time for another Sketch Challenge from The Memory Nest - this is the 2nd challenge for the month of February.  I really hope you will play along with us - not only will you create what I am sure will be a FAB-U-LOUS Layout - you could WIN a GIFT CERTIFICATE to THE MEMORY NEST too!

I thought I would do something a little different on this blog post / sketch challenge. I want to take you along with me, and give you a little insight on how I go about interpreting a sketch, and designing a layout.  I hope you continue to read through my creative process:

Step (1) First UP  "THE SKETCH"  - Yes, its "ALL about The Sketch, 'bout The Sketch, - No Trouble!"  (Okay who else has "All About the Bass" running through their brain now?? - sorry about that!)

But that is what a Sketch means to me -  "No Trouble" or "Less Trouble" Scrapbooking!  They really help me to complete layouts, and to make some headway with all of the photos that I take, and memories that I want to record!  AND - when you play along with a Sketch Challenge, you get a chance to WIN something too!

Without further ado - let me show you this AWESOME Sketch, that was designed by Leslie Germain.

I decided to go along with 2 photos as shown in the sketch.  That's the cool part - I could have easily have selected 3, or even turned the 2 photos into 4 - as long as you can look at the sketch, and look at your layout and "see" the sketch design in you project - I feel that it is all about how YOU "Interpret" the sketch.

Step (2) - I pulled out my box of printed photos, and started looking for (2) 4x6 "landscape" sized photos as shown.  Well, I wasn't that successful, as one of the 2 photos that caught my eye was "portrait."  I decided to use it anyway, and just trim it down a bit, and since, as I said above, sketch challenges are all about "your" interpretation of the sketch - YES - you can do that!!

Step (3) Next, I try to find my color scheme for the layout.  To do this, I usually try to work off the colors in the photos.  (Although, sometimes it is all about the paper that is "calling my name" at the moment! - or that I just bought and really want to use!)


In this case, the 2 photos that I picked had very vibrant colors. I began to dig through my drawers and boxes of "MISC" pattern papers and "KITS" to see what would look best.   I came across one of my ALL TIME FAVORITE Paper Collections - Marrakesh, by Basic Grey.  I originally made a mini album with this paper line for my cousin's engagement party, many years ago - and had quite a few papers and scraps left - many of them in the correct square shape needed for the sketch!!  BINGO!!   
*As an ADDED TIP - I usually place most of the papers/elements on the base page BEFORE I glue them down, and sometimes even take a picture of the page with my phone - A. to get a different perspective and  B. to look at when it is time to reassemble and glue down.

Here is my take on the sketch!

As you can see, I used 4 different patterned papers, along with the soild orange background and blue base paper
 - I love the Orange and Blue combo!
I added the journaling on a small tag 
- to which I added a "Hidden Mickey" to, too!
I also searched my "stash" for coordinating embellishments /gems/fibers Et cetera, to add to the layout too.


And here are some close ups for you too!
I layered stickers on top of the chipboard elements from the Marrakesh Collection, and even added a green pearl embellishment on top of it! The blue word "Adventure" - as well as "Epic" are from Heidi Swapp.

I love to create hidden pockets behind photos by adding 1/2 inch 3D Foam Dots to only 3 sides of a Mat, in this case, I left the top open, and inserted an embellished tag, which I journaled on both sides about our trip.
******************************
I hope that gives you a little insight on how I approach a Sketch or Sketch Challenge, and that it motivates you to give it a try and play along with me sometime!


Here are the items that I used for this Layout:
Base - "Around the Block" - #00237 - Ride the waves
Basic Grey Marrakech: 5 different pattern papers, Element Stickers, and Chipboard Elements
Powder Puff - Marichino Cherry  and Blue Moon Chalk Inks
Heidi Swapp - Words Hs01109 and HS 00654
Tim Holtz Tag Die
Queen and Co -Twinkle Goosebumps
Various Assorted Bling/Brads/fibers and cardstock


* I am also linking this post and layout to the latest Paper Issue Blog Challenge!  "Perfect Pairing" - 2 of my favorite colors - Orange and Blue -and a "Perfect Pair" - my husband and I celebrating our 30th Anniversary  - at Disneyland! Hop on over  and Check it out too!*

As always, THANK YOU for stopping by and feel free to leave a little "Bloggy LOVE" if you have a minute!

((HUGS)) ~ Sherri

Saturday, February 7, 2015

Challenge YOUrself #15 - Color Challenge

Welcome my Scrappy Friends!  
Can you believe we are already through the first week of February 2015!!  Time sure does fly!  

This months Challenge over at 
The Challenge YOUrself Blog! 
 is another FUN one!  
 It's all about YOU and COLOR!!

Here is your challenge for February:
Challenge #15: Color Challenge  {  I am.......}
Use the affirmation:  
"I am________ " in your title or journalling with this color combo.


So - what to do, what to do?  

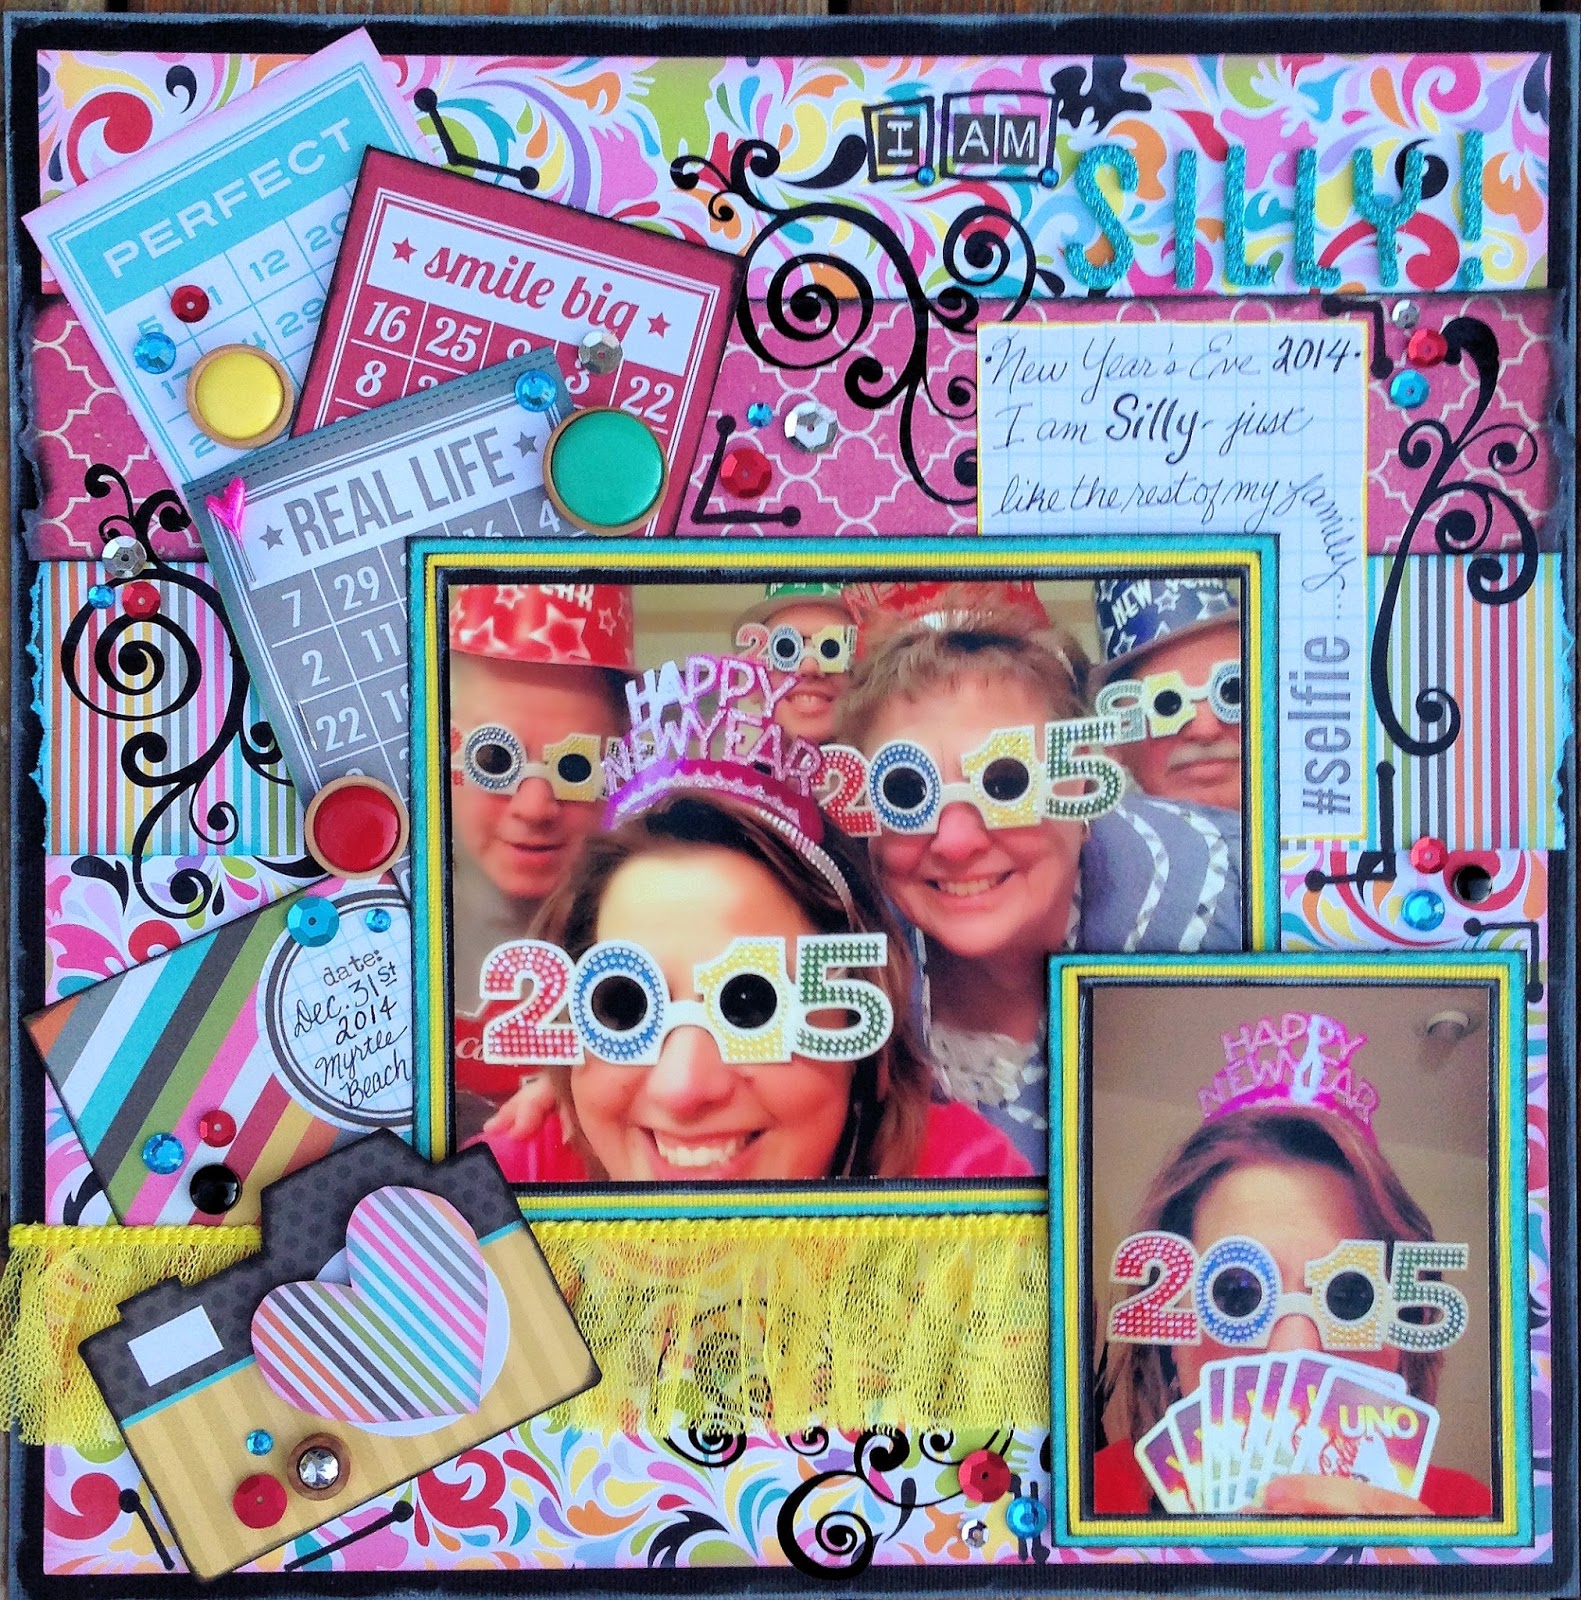
I was looking through my phone and the colors on a few photos that we took on New Year's Eve jumped out at me. 
I decided to use them in the layout below, as I think they fit this color pallet quite well, 
don't you?

And, as far as filling in the blank for "I am_____"  the photo immediately made me think of "SILLY" - Because what FUN is Life, if we can't be "SILLY" sometimes!

So after pulling out some papers and embellishments from my stash - here is the layout that I came up with:


Like I mentioned above, the photo was taken on New Year's Eve,. It was while we were away on a vacation with my parents in Myrtle Beach.  We love visiting there between Christmas and New Years.  While it certainly is not beach weather there during that week, the ocean is still beautiful to look at, and most of the restaurants, shops and mini-golf places are open.  We really enjoy just relaxing, spending time together, watching the dolphin's swim by our balcony, and playing games together in the evening.

Here are a few close ups of all the "STUFF" I used on this layout:

Sequins, Brads, Rub-ons, Ribbon... Oh My!

I don't know about you -but I think these "Wood Sprinkles" from Jillibean Soup are Super HOTNESS! - Yes, I did buy one of every color pack they offer!!

Love my #Selfie Stamp
 
 Isn't this yellow fringed ribbon just AWESOME!
My Scrappy friends and I have nicknamed it 
"BIG BIRD!"

Here are the Items I used:
Bella Blvd McIntosh Calendar Item #756
Simple Stories Snap Life #2821 Bingo Cards/Stripe
Simple Stories Fab-U-Lous #2114 4x12 Title Strip Elements
Bazzill, Black and Yellow Cardstock
Bo Bunny Caribbean Double Dot
Jillibean Soup Wood Sprinkles
Little Yellow Bicycle Stick Pin
Glitz Design Rub Ons - Glam Small Flourishes
Echo Park - This and That Alpha Stickers
Thickers - Hooray Glitter - Teal
Maya Road Yellow Tulle Ribbon -aka "BigBird"
#Selfie Stamp by RUKRISTIN.com

All items in this layout were purchased at my LSS Scrap-a-Doodle Doo!


Thanks for stopping by - I hope you visit us over at The Challenge YOUrself Blog, and REALLY HOPE that you play along with us!  I'd LOVE to see what you create, and what your "are" too! 

(((HUGS))) ~ Sherri


Monday, February 2, 2015

The Memory Nest Make it Monday #33 February Sketch Challenge #1

Happy February everyone!  
I want to share this really FUN Sketch with you - from over at 

Crystal Schneider really did a great job on this sketch!  
I love all of the straight lines, and the way it just calls for lots of different pattern papers!


For my "INSPIRATION LAYOUT" for The Memory Nest's Design Team, I decided to use papers and embellishments from the Teresa Collins "Memories" Collection - ( that I got on CLEARANCE - from The Memory Nest! - LOVE THEM! ) I thought that the color combo of the papers really called for a black and white photo to be used.  The photo I picked for this layout is a #Selfie of my youngest son and I from our December 2014 trip to Myrtle Beach, SC.

Here is my take on the sketch for the DT:


and here are a few close ups too!:

I added the photo using 1/2 inch Foam Dots - and created a pocket to slip a tag into, which contained hidden journaling about our trip.
After inking the edges, I cut a few of the cameras from the washi tape and used them to embellish the tag too.


I used some of the collection's stickers and paper punch out tags, along with some cardstock and a #Selfie Stamp to create this embellishment grouping.

I used a black Sharpie to make some straight lines - here and there on the layout, and I LOVE the camera washi tape too!

Here you can see how those pieces of the washi tape, inked edges and 3 different fibers really add to the the look of what was once a plain journaling tag.  I used the tag to tell a little overview of our "After Christmas Vacation," so that we will be able to remember it for years to come.


Here are the items used for this layout:
Teresa Collins - "Memories" Collection (Word Paper, Flower Paper, Calendar Paper) and Stickers
Teresa Collins - "Summer Stories" - Washi Tape collection 
Teresa Collins - "Memories" Die Cut Flowers and Accessories
Bo Bunny - Caribbean Double Dot Cardstock
Grey Bazzill Cardstock
Ranger Distress Stains: Black Soot / Peacock Feathers / Brushed Pewter
Silver Chalk Ink
Powder Puff Maraschino Cherry Chalk Ink
Selfie Stamp
Clear Star -Gelly Roll Pen
Thickers - Print Shop Pink Letters

As always - Thanks for stopping by and I hope you will play along with us at The Memory Nest!    
you could WIN a GIFT CERTIFICATE to THE MEMORY NEST too!
I can't wait to see your creations!

((HUGS)) ~ Sherri